Photo Spy Cam using Arduino
These shields designed for Arduino and Raspberry Pi integrates a SD Reader and Camera module which allows to easily take realtime photos and save them to a SD card.
The idea is simple: Take photo, download the photo from the Camera Shield (which is already compressed in JPEG) and save it to the SD Card. Then repeat this logic multiple times until the sd card is full. If the sd card is full, starts overwriting the first photos' files.
If you want to spy someone in your house and know what are they doing in your absense, this is one of the potential solutions for you...
-
Notes:
- It will take around 1 sec to take photos with 160x120 pixels, which means, you will have photos every 1 sec.
- It will take around 3 secs to take photos with 320x240 pixels, which means, you will only have photos every 3 secs.
- It will take around 8 secs to take photos with 640x480 pixels, which means, you will only have photos every 8 secs.
Article Index
- 1. Introduction
- 2. Hardware selection
- 3. System assembly
- 4. Software: Arduino code
- 5. Get the kit
- 6. Share this and your project with the world
- 7. Issues
STEP 1: Introduction
Ingredients
Spy Cam:
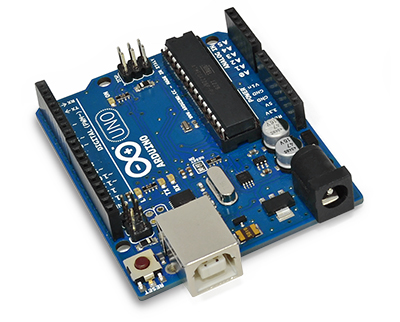
- 1 x Arduino Uno
- 1 x Spy Cam LSY201
- 1 x Spy Cam VC0706
- 1 x SD Car Reader/Writer
- 1 x Power Converter (to give electricity to Arduino)
Difficulty: Medium
![]()
Preparation time: 1 day
STEP 2: Hardware selection
The boards (shields) we are going to use in this tutorial are the Linksprite LSY201 and VC0706 spy cams.
You can try to install other camera shields too, but be sure that the library that you use allows it... (We will see this point bellow)
It doesn't matter which SD Card reader/writer you use, as long it works.
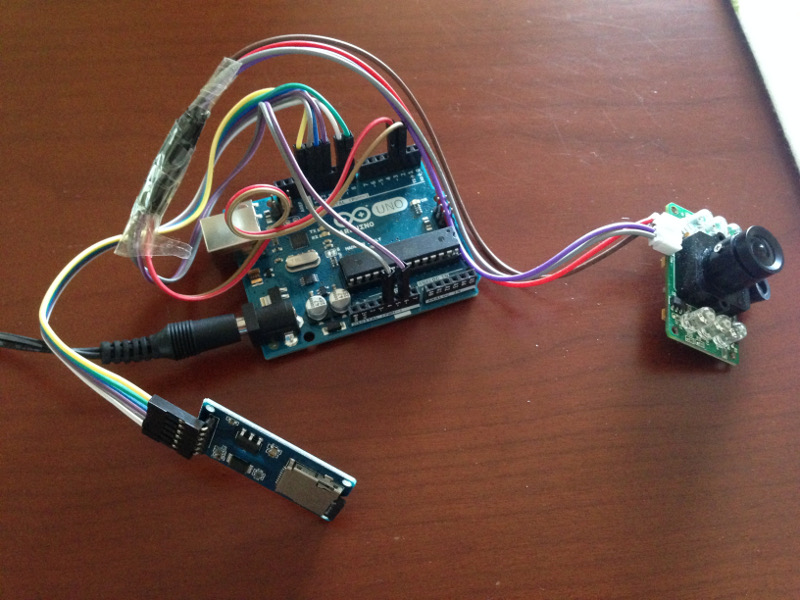
STEP 3: System assembly
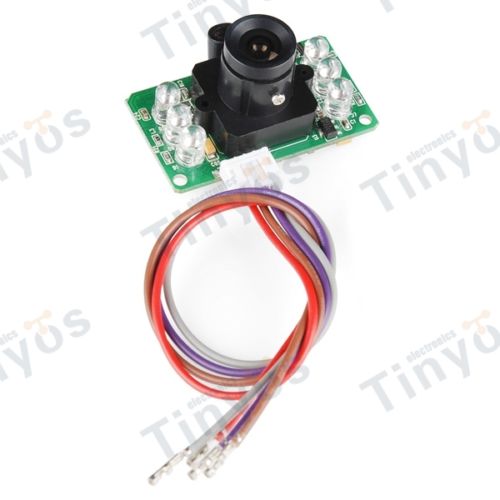
For the LSY201 camera shield, please connect the LSY201's pins to the following Arduino pins:
- red: rx (IN) => it should be connected to the TX (OUT) of arduino => pin 3
- brown: tx (OUT) => it should be connected to the RX (IN) of arduino => pin 2
- purple: ground
- gray: 5v
Here is an image of the LSY201 camera:
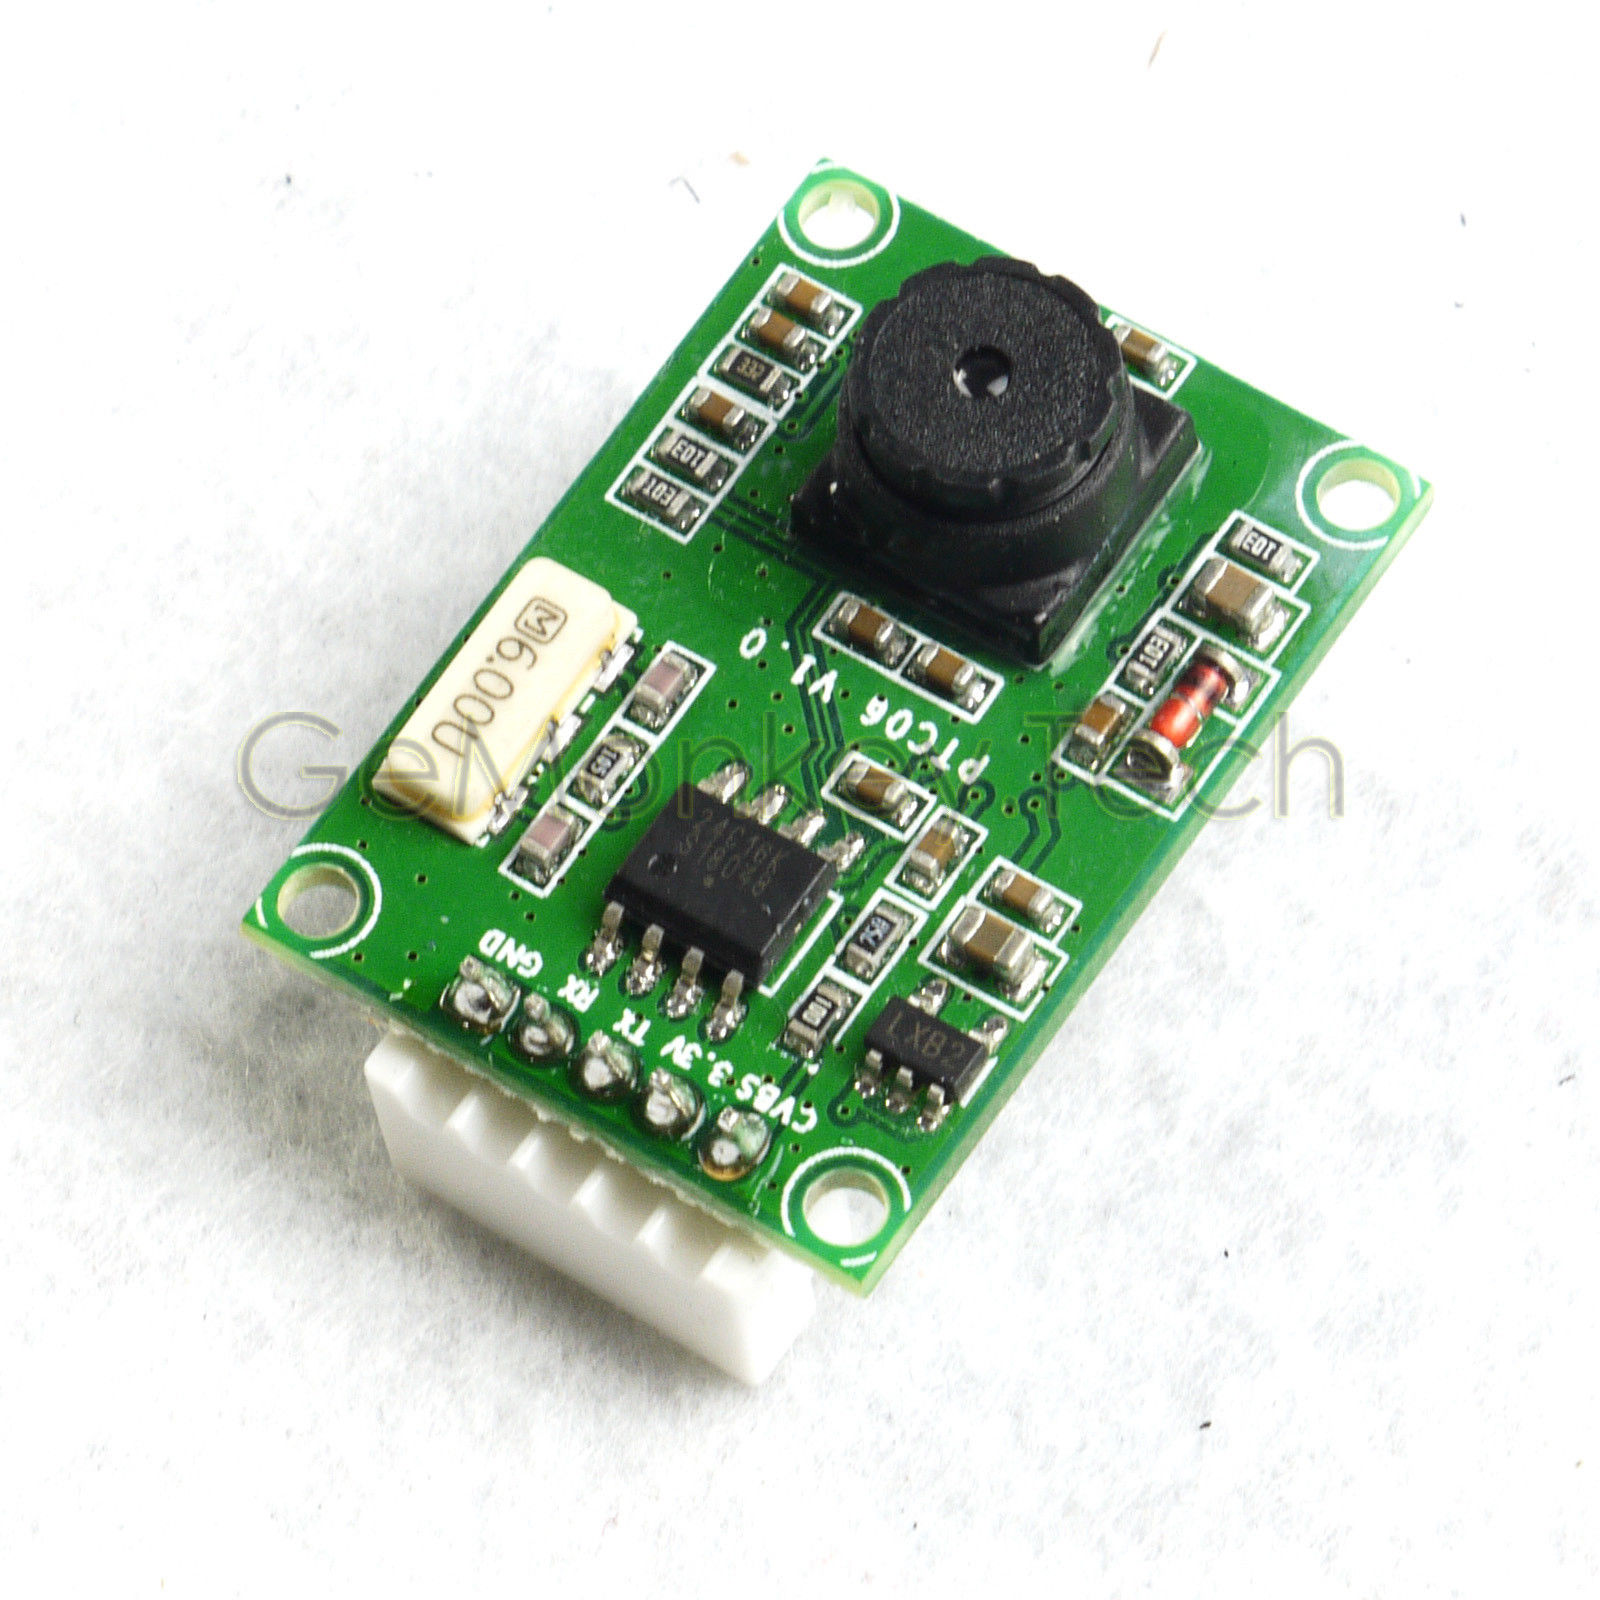
For the VC0706 camera shield, please connect the VC0706's pins to the following Arduino pins:
- CVBS: N/A for this example
- 3.3V: red cable
- TX (OUT): brown cable => it should be connected to the RX (IN) of arduino => pin 2
- RX (IN): purple cable => it should be connected to the TX (OUT) of arduino => pin 3
- GND: gray cable
Here is an image of the VC0706 camera:
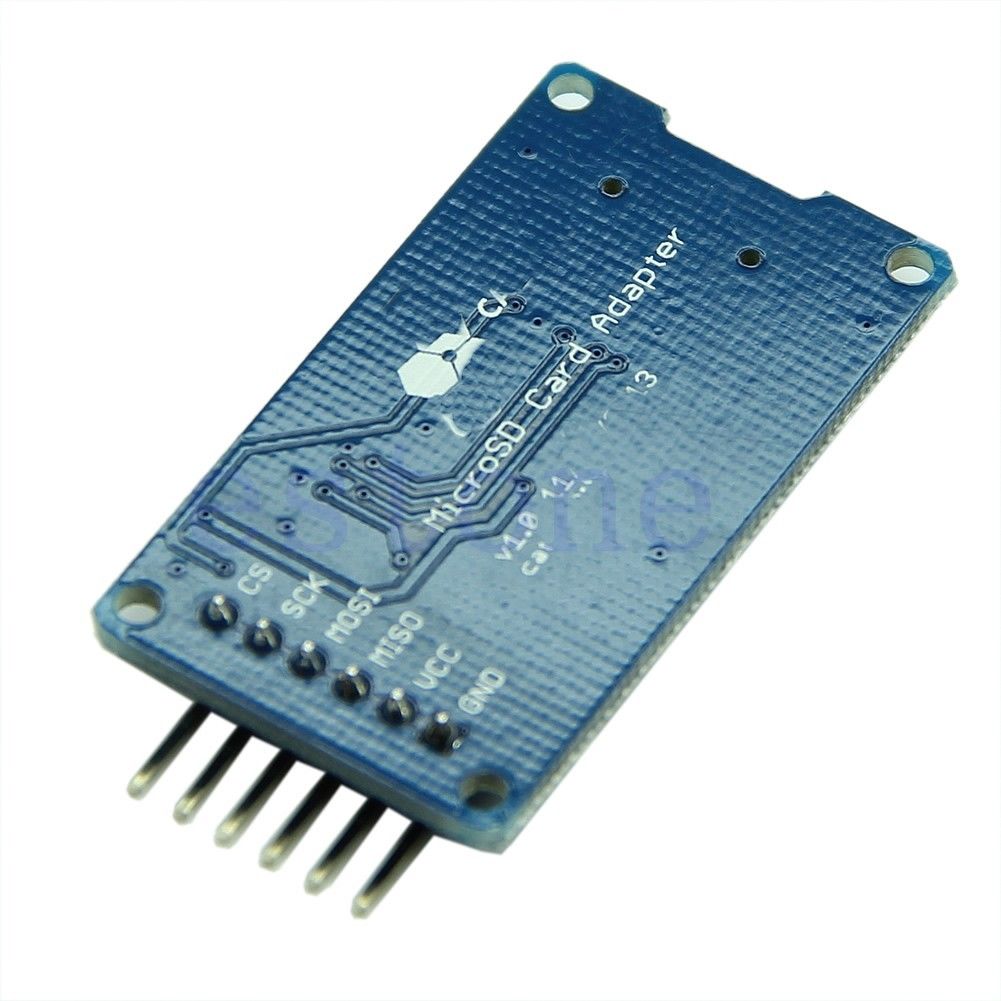
For the SD Card reader/writer shield, please connect the following pins:
- CS: connect to arduino pin 9
- SCK: connect to arduino pin 12
- MOSI: connect to arduino pin 10
- MISO: connect to arduino pin 11
- VCC: connect to arduino pin 8
- GND: connect to arduino pin 13
Here is an image of the SD Card Reader/Writer Shield:
Installation
After you connect everything, just put everything in a box, like this:
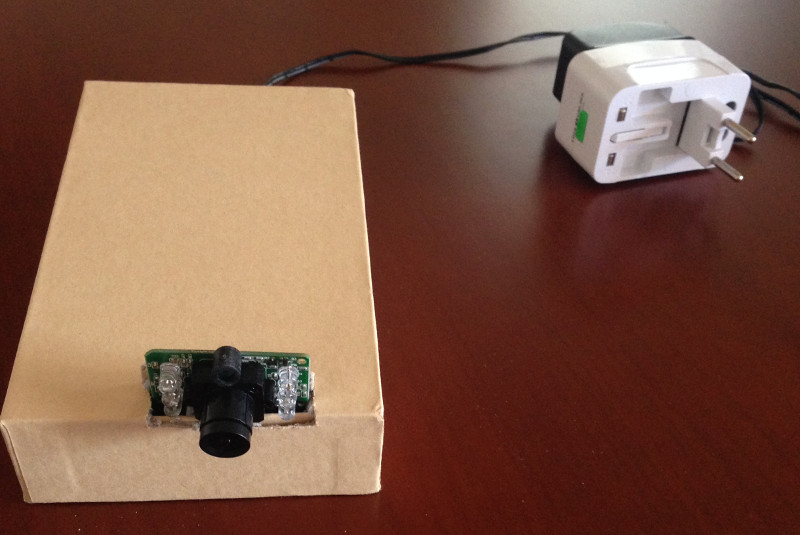
Then put the box in a hidden place...
STEP 4: Software: Arduino code
Remember, the shileds' pins have to be set on right Arduino pins, otherwise you must update my code.
When you switch on your arduino, it initializes the SD Card shield and the Camera and then starts taking photos and saving them...
Because of the SD Card partition type (FAT32), this logic saves the photos in different folders, where the maximum number of files per directory is 450, but you can change this, by changing the variables: 'maximum_files' and 'maximum_folders'.
Here is the code for the LSY201 camera shield:
/** * https://github.com/chendry/LSY201 * * LSY201 - LinkSprte JPEG Colour Camera TTL Interface - Infrared - for Arduino: * - red: rx (IN) => it should be connected to the TX (OUT) of arduino => pin 3 * - brown: tx (OUT) => it should be connected to the RX (IN) of arduino => pin 2 * - purple: ground * - gray: 5v * * assuming the TX and RX pins on the camera are attached to pins 2 and 3 of the arduino. */ #define SERIAL_RX_BUFFER_SIZE 256 #define SERIAL_TX_BUFFER_SIZE 128 #include#include #include #include SoftwareSerial camera_serial(2, 3); LSY201 camera; uint16_t buffer_size = 240; uint16_t file_num = 0; uint16_t folder_num = 0; uint16_t maximum_files = 450;//for 8GB card; 20 photos/minute; 34 days/8GB == 1.000.000 photos uint16_t maximum_folders = 450;//1000 x 1000 = 1.000.000 char* tracking_fn = "TRACKING.TXT"; void setup() { //unsigned long setupStartTime = micros(); //activate 5V for the SD Card shield pinMode(8, OUTPUT); digitalWrite(8, HIGH); Serial.begin(38400); // Wait for the serial port to be opened while (!Serial) delay(25); Serial.println("Info: Setup is starting..."); //check SD if (!SD.begin(9)) Serial.println("Error: SD initialization failed,"); //else //Serial.println("Info: SD Initialization complete,"); delay(300); //Serial.println("Info: getting last pic num for the created files..."); prepareNewSDFileAndFolderNum(); //Serial.println(folder_num); //Serial.println(file_num); //Serial.println("Info: Creating folder if not exists..."); createFolder(); camera.setSerial(camera_serial); //camera.setDebugSerial(Serial); camera_serial.begin(38400); delay(50); //Serial.println("Info: Reseting cam to default values..."); camera.reset(); //Serial.println("Info: Changing picture size..."); camera.setImageSize(LSY201::Medium); delay(2500); //Serial.println("Info: Reseting cam so image new size can take effect..."); camera.reset(); //Serial.println("Info: Setting image compression ratio..."); //Call setCompressionRatio with a value between between 0 (low compression, high quality) and 0xFF (high compression, low quality.) camera.setCompressionRatio(0x60);//default is 0x20 delay(3000); //Serial.println("Info: Clear cache"); camera.stopTakingPictures(); Serial.println("Info: Setup is DONE!"); //unsigned long setupEndTime = micros(); //Serial.print("Info: Setup elapsed time (in secs): "); //Serial.println((float)(setupEndTime - setupStartTime) / 1000000); } void loop() { //unsigned long mainStartTime = micros(); takePic(); //unsigned long mainEndTime = micros(); //Serial.print("Info: Main elapsed time (in secs): "); //Serial.println((float)(mainEndTime - mainStartTime) / 1000000); } void takePic() { //Serial.println("Taking picture..."); camera.takePicture(); delay(50); //Serial.println("Saving picture..."); savePicToFile(); //Serial.println("Done."); camera.stopTakingPictures(); } void savePicToFile() { //Serial.println("Info: Preparing folders"); file_num++; if (file_num > maximum_files) { file_num = 1; folder_num++; if (folder_num > maximum_folders) folder_num = 1; createFolder(); } //Serial.println("Info: Preparing new file name"); char filename[20]; sprintf(filename, "/DCIM/%i/%i.JPG", folder_num, file_num); //Serial.println("Info: saveLastFileName"); //keep tracking of current photo num saveLastFileName(filename); // Create file //SD.remove(filename); //File testFile = SD.open(filename, FILE_WRITE); File testFile = SD.open(filename, (O_WRITE | O_CREAT | O_TRUNC)); //if it opens ok if (testFile) { //save to file Serial.print("Info: Saving photo to SD: "); Serial.println(filename); uint8_t buf[buffer_size]; uint16_t offset = 0; uint16_t i; //unsigned long startTime = micros(); while (camera.readJpegFileContent(offset, buf, buffer_size)) { for (i = 0; i < buffer_size; i ++) { testFile.write(buf[i]); //Serial.print(buf[i], HEX); //Serial.print(" "); } //Serial.println(); offset += buffer_size; } //unsigned long endTime = micros(); //Serial.print("Info: Elapsed time (in secs): "); //Serial.println((float)(endTime - startTime) / 1000000); Serial.print("Info: Bytes for photo: "); Serial.println(offset); } else //else it didn't open ok Serial.println("Error: Error opening file on SD,"); //must close file to finish writing. testFile.close(); } void saveLastFileName(char* filename) { File testFile = SD.open(tracking_fn, (O_WRITE | O_CREAT | O_TRUNC)); testFile.write(filename); testFile.close(); } void createFolder() { char folder[15]; sprintf(folder, "/DCIM/%i/", folder_num); if (!SD.exists(folder)) { SD.mkdir(folder); } } void prepareNewSDFileAndFolderNum() { prepareNewSDFileAndFolderNumFromTrackingFile(); File root; if (folder_num == 0) { root = SD.open("/DCIM/"); folder_num = getFileLastNumForDirectory(root); root.close(); folder_num = folder_num > 0 ? folder_num : 1; } if (file_num == 0) { char folder[15]; sprintf(folder, "/DCIM/%i/", folder_num); if (SD.exists(folder)) { root = SD.open(folder); file_num = getFileLastNumForDirectory(root); root.close(); } } //Serial.print("folder_num:"); //Serial.println(folder_num); //Serial.print("file_num:"); //Serial.println(file_num); //while(1); } void prepareNewSDFileAndFolderNumFromTrackingFile() { folder_num = 0; file_num = 0; if (SD.exists(tracking_fn)) { File f = SD.open(tracking_fn, FILE_READ); String fname = ""; while (f.available()) { char ltr = f.read(); fname += ltr; } f.close(); if (fname.length() > 1) { if (fname.substring(0, 1) == "/") fname = fname.substring(1); if (fname.substring(0, 5) == "DCIM/") fname = fname.substring(5); uint8_t pos = fname.indexOf("/"); if (pos > 0) { folder_num = getFileNameNumber( fname.substring(0, pos) ); file_num = getFileNameNumber( fname.substring(pos + 1) ); } } } } uint16_t getFileLastNumForDirectory(File dir) { uint16_t n = 0; uint16_t fn = 0; File entry; String name; dir.rewindDirectory(); while (true) { entry = dir.openNextFile(); if (!entry) // no more files break; name = (String) entry.name(); entry.close(); fn = getFileNameNumber(name); if (fn > n) { n = fn; } } return n; } uint16_t getFileNameNumber(String name) { name.toUpperCase(); name.replace(".JPG", ""); if (isValidNumber(name)) return name.toInt(); return 0; } boolean isValidNumber(String str) { uint8_t l = str ? str.length() : 0; if (l > 0) { for (byte i = 0; i < l; i++) { if (!isDigit(str.charAt(i))) return false; } return true; } return false; }
Note that this code uses the LSY201 library and you can download it here or here.
Please click here to download this code for the LSY201.
Here is the code for the VC0706 and other camera shields:
/** * LSY201 - LinkSprte JPEG Colour Camera TTL Interface - Infrared - for Arduino: * - red: rx (IN) => it should be connected to the TX (OUT) of arduino => pin 3 * - brown: tx (OUT) => it should be connected to the RX (IN) of arduino => pin 2 * - purple: ground * - gray: 5v * * VC0706 3.3V Camera Module TTL/UART Jpeg/CVBS For AVR STM32 Arduino Compatible: * - It's writen in the board, so if you use the same cable that you use for the LinkSprite Camera above: * + cvbs: N/A for this example * + 3.3V: red cable * + TX (OUT): brown cable => it should be connected to the RX (IN) of arduino => pin 2 * + RX (IN): purple cable => it should be connected to the TX (OUT) of arduino => pin 3 * + GND: gray cable */ #include#include #include #include File testFile; SoftwareSerial s(2, 3); JPEGCamera cam(s); char filename[15]; int num = 0; int numOfBytes; int camType = 1; //1 for LSY201 cam; 2 for VC0706 cam. int photoSize = 1; // 0 -> 160x120 / 1 -> 320x240 / 2-> 640x480 unsigned long mainStartTime, mainEndTime, startTime, endTime; void setup() { //activate 5V for the SD Card shield pinMode(8, OUTPUT); digitalWrite(8, HIGH); Serial.begin(38400); // Wait for the serial port to be opened while (!Serial) delay(25); //check SD if (!SD.begin(9)) Serial.println("Error: SD initialization failed,"); else Serial.println("Info: SD Initialization complete,"); // Serial port connected to the cam if (camType == 1) { s.begin(38400);//for LSY201 cam delay(50); Serial.println("Info: Reseting cam..."); //reset cam and wait. cam.reset(); delay(3000); } else { s.begin(115200);//for VC0706 cam delay(50); Serial.println("Info: Reseting cam..."); //reset cam and wait. cam.reset(); delay(3000); Serial.println("Info: Changing baud rate..."); //change baud rate to work at 3.3v cam.chBaudRate(2);// 0 -> 9600 / 1 -> 19200 / 2 -> 38400 / 3 -> 57600 / 4 -> 115200 delay(50); //change serial to match new camera baud rate s.end(); s.begin(38400); delay(50); } //Serial.println("Info: de-activate powersaving..."); //no need. Already de-activated by default //cam.powerSaving(false); //delay(50); Serial.println("Info: Changing picture size..."); //change picture size cam.chPictureSize(photoSize); delay(2500); Serial.println("Info: getting last pic num for the created files..."); num = getNewSDFileNum(); Serial.println("Info: Setup is DONE!"); } void loop() { mainStartTime = millis(); takePic(); mainEndTime = millis(); Serial.print("Info: Main elapsed time (in secs): "); Serial.println((mainEndTime - mainStartTime) / 1000); } void takePic() { Serial.println("Info: Preparing to take new photo."); //must call stopPictures before a new photo is taken. cam.stopPictures(); delay(50); //take photo cam.takePicture(); delay(50); num++; sprintf(filename, "PIC_%i.JPG", num); if (SD.exists(filename)) { SD.remove(filename); } // Create file testFile = SD.open(filename, FILE_WRITE); //if it opens ok if (testFile) { //save to file Serial.print("Info: Saving photo to SD: "); Serial.println(filename); startTime = millis(); numOfBytes = cam.readData(testFile); endTime = millis(); Serial.print("Info: Elapsed time (in secs): "); Serial.println((endTime - startTime) / 1000); Serial.print("Info: Bytes for photo: "); Serial.println(numOfBytes); } else //else it didn't open ok Serial.println("Error: Error opening file on SD,"); //must close file to finish writing. testFile.close(); } int getNewSDFileNum() { File root = SD.open("/"); int n = getFileLastNumForDirectory(root); root.close(); return n > 0 ? n : 0; } int getFileLastNumForDirectory(File dir) { int n = 0; int fn = 0; while (true) { File entry = dir.openNextFile(); if (!entry) { // no more files break; } fn = 0; if (entry.isDirectory()) { //fn = prepareFileLastNumForDirectory(entry);//no need to be recursively } else { String name = String(entry.name()); if (name.startsWith("PIC_") && name.endsWith(".JPG")) { int pos = name.indexOf(".JPG"); name = name.substring(4, pos); if (isValidNumber(name)) fn = name.toInt(); } } if (fn > n) { n = fn; } entry.close(); } return n; } boolean isValidNumber(String str) { if (str && str.length() > 0) { for (byte i = 0; i < str.length(); i++) { if (!isDigit(str.charAt(i))) return false; } return true; } return false; }
Note that this code uses the JPEGCamera library and you can download it here.
Please click here to download this code for VC0706 and other camera shields.
STEP 5: Get the kit
Cam and SD Card Shields for Arduino:
- 1 x Arduino Uno
- 1 x Spy Cam LSY201
- 1 x Spy Cam VC0706
- 1 x SD Car Reader/Writer
- 1 x Power Converter (to give electricity to Arduino)
STEP 6: Share this and your project with the world
Share this and your project with the world, this is, create a web-page and index it on the search engines, create a Facebook page, share this page link in your facebook and twitter, etc...
By sharing your project, you are giving to other people the opportunity to develop new projects and improve yours...
STEP 7: Issues
Currently I'm having only 1 issue, where the SD Card shield stops saving photos correctly. Basically it saves correctly around 55.000 photos (around 750MB) and after that it starts saving corrupted files with 0 bytes of size.
Maybe the problem is my SD Card shield, since it only cost me a few cents, but I'll update this page again, as soon as I fixed this issue.